In times when fire was controlled only by gods armed with burning thunderbolts this primitive tool was something magical. It allowed a skill handed user to start fire within a few dozens of seconds .
Before the advent of flints and finally matches or lighters, the bowdrill remained a breakthrough invention for mankind for a long time.
There is nothing stopping you from making this age-old miracle yourself. For this purpose you need the right materials, a little bit of persistence and imagination:
The wood should be dry but not rotten, preferably from withered branches still hanging on the tree or whole withered trees. An auger as straight as possible, 20-30cm long and about thumb thick, rounded at the bottom, sharpened at the top like a pencil. A board about 1.5-2cm thick. The optimal choice for the pressure block would be the same species of wood used to make the rest of the components, possibly a harder tree. “Bow” is not a casual term and should be made from a fresh, flexible, bow-shaped branch about 60cm long. The string should not be tightened too much. A thick thong cut from a leather strap will work great – the ones from your grandmother’s sewing machine seem to be made for bowdrills. McGyver would probably also recommend a starter cord (such as the one used to fire lawnmower engines or chain saws) and wouldn’t mind a parachute cord either.
Wood is not the same as wood, so using the experience of your ancestors, choose such species of wood and their combinations, which have been successfully tested many times.
If you use an auger, it is best made of hazel, and the board of pine. You can supplement the rest with poplar or birch.
In case you limit yourself to one species for making all wooden parts of the bowdrill, the following will be a good choice: linden, willow, pine, sycamore, maple, fir, wild rose, dune pine, elderberry, spruce, fir, larch, elm.
You’ve already obtained wood from your neighbor’s garden, stripped the leather drive belt from your grandmother’s old ‘Singer’, put everything together, but what next?
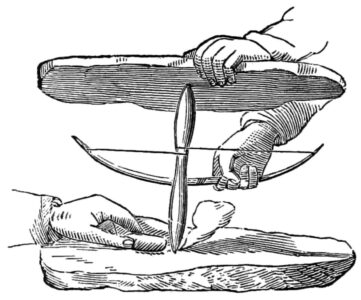
First you make a small hollow with your knife and start drilling into the base, moving the bow back and forth to give the auger a rotating motion. Gently at first, then pushing harder until there is smoke. If there’s smoke, it’s working.
Next you make a V-shaped notch that should extend to the center of the socket.
You start the ‘drilling operation’ again, but now you put something under the cut that will serve as kindling (bark, a leaf, a horn, a thin board). The smoke thickens, then you press down harder, increase the pace, and continue drilling for a while.
Sounds a bit like a description of a bizarre sexual act, lined with a wooden fetish, but what can you do, this is how it works.
The rest will be done for us by our lungs and the ability to ‘blow fire’ from a sparkle.
So much in brief and in theory, in practice it is not so simple, especially for novices. It is also not an art which needs to be learned for years at Bushmen universities. It takes only a few dozen minutes of practice to manage to make fire.
Contemporary adepts of this ancient art, for whom description and drawing seem to be too archaic form of acquiring knowledge, we refer (half jokingly, half seriously) to the treasury of all “tutorials”, which is the YouTube platform – you will find there plenty of more or less successful attempts.
In the meantime, get to work! You never know when you will forget to buy matches for your smokes. ;)
copyright© by Juliusz Wojciechowicz